| Backyard Aquaponics http://byap.backyardmagazines.com/forum/ |
|
| Redesigned Flood Tank 5 gallon http://byap.backyardmagazines.com/forum/viewtopic.php?f=8&t=12210 |
Page 1 of 2 |
| Author: | thorn [ Mar 28th, '12, 23:10 ] |
| Post subject: | Redesigned Flood Tank 5 gallon |
Enclosed Tezel Surge 
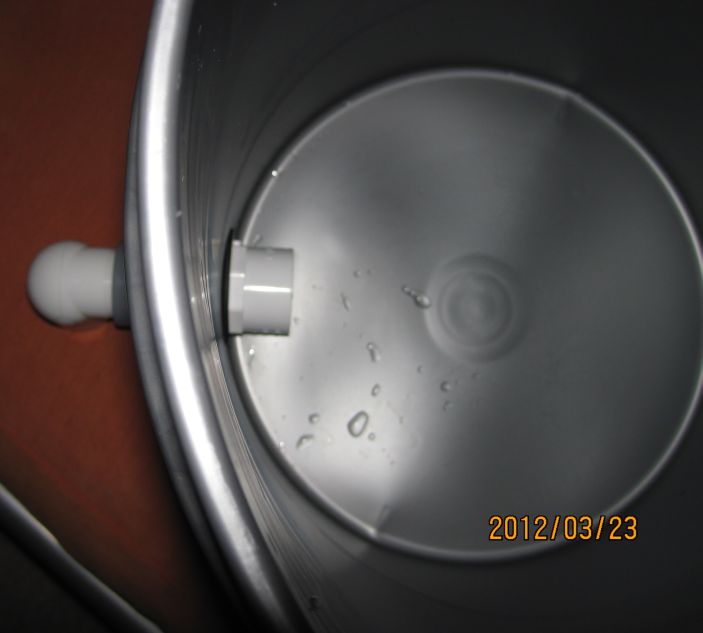
I have been using a 5 gallon bucket for the container of my flood and drain tank. Normal, cheap 5 gallon buckets are not made very durable and I have a couple develop cracks on the bottom due to stress of the weight of the water column above it and the weight of the pvc hanging off from it. In an effort to eliminate this stress to improve reliability of cheaper containers, I have altered my surge device to fit completely inside a 5 gallon bucket. This method makes building a flood and drain tank easier by minimizing effort to drilling a 1 3/4 inch hole, cutting two pieces of pipe, and hand assembly of all the parts. Updated Design: 
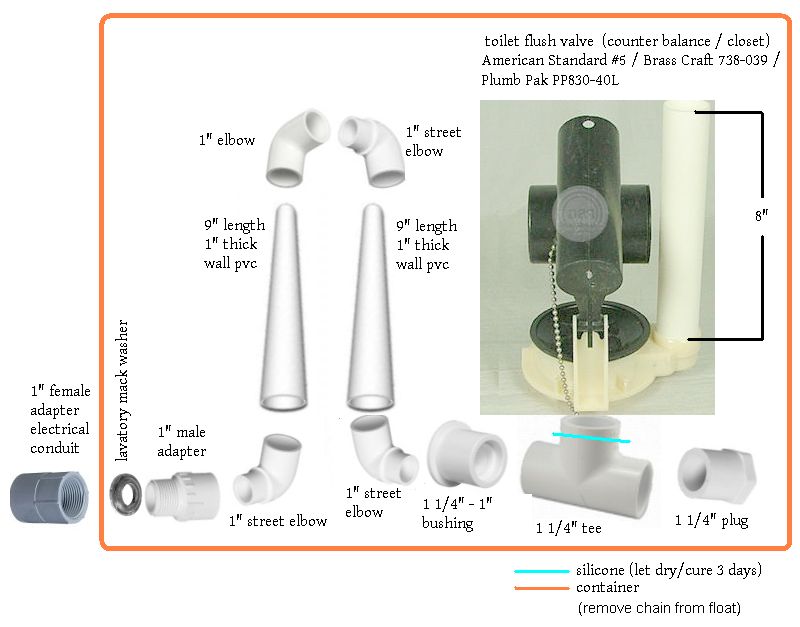
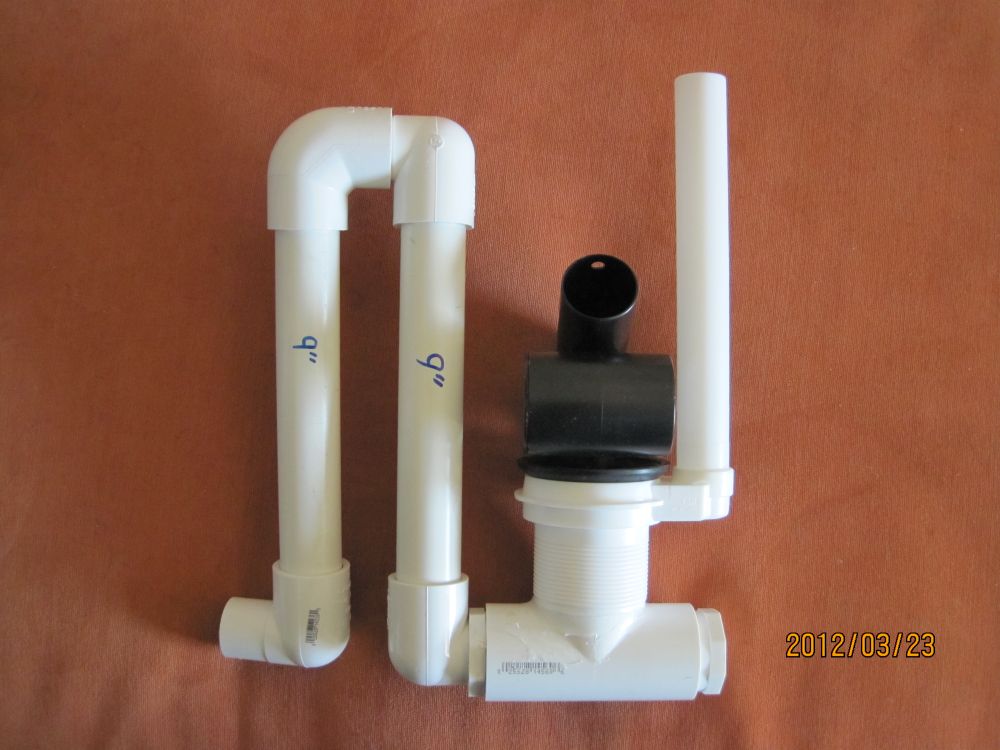
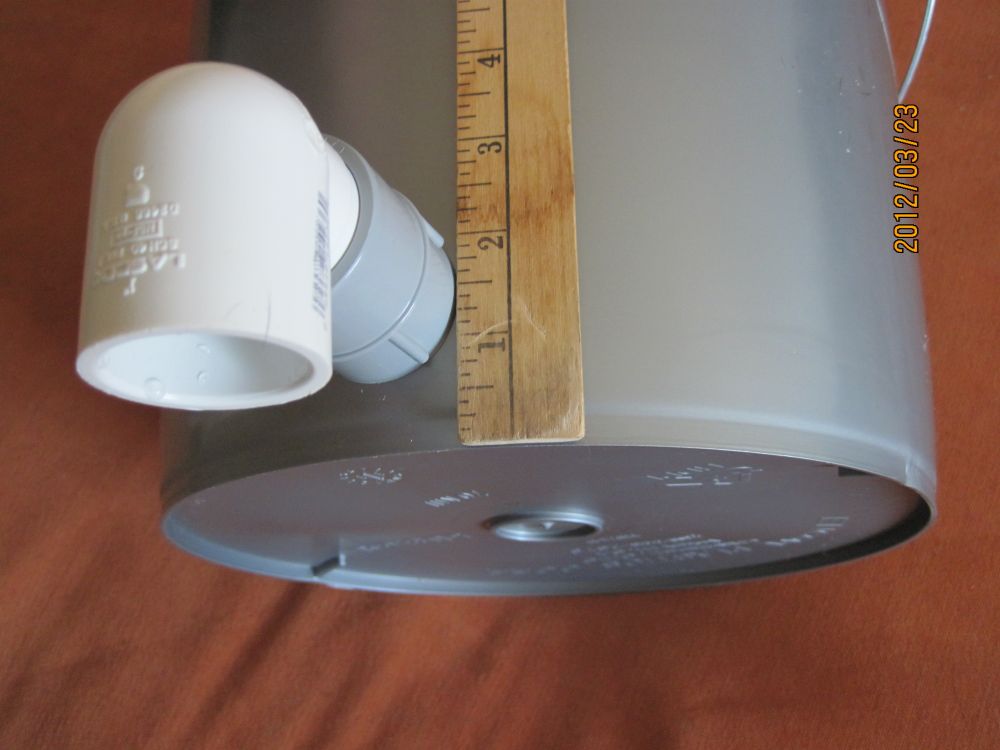
Below is a diagram of my actual setup with measurements. All pipe is thick walled. I use the Plumb Pak PP830-40L flush valve model from Lowes. A 1.25 inch tee is siliconed inside the bottom of the flush valve. One end of the tee has a plug while the other end has a 1.25 - 1 inch bushing. From there, the bushing has a 1 inch street(spigot) elbow pointed up into a 9 inch length of 1 inch pvc pipe. The top of that has another 1 inch street elbow and a 1 inch normal elbow pointing back down into another 9 inch pipe. The bottom of that pipe has a 1 inch street elbow going into the bung. The bung is made of a 1 inch pvc threaded adapter, a lavatory mack washer, and a 1 inch female conduit adapter. The external conduit adapter has a down pointing street elbow in it. ![]() ![]() Additional design assembly: 
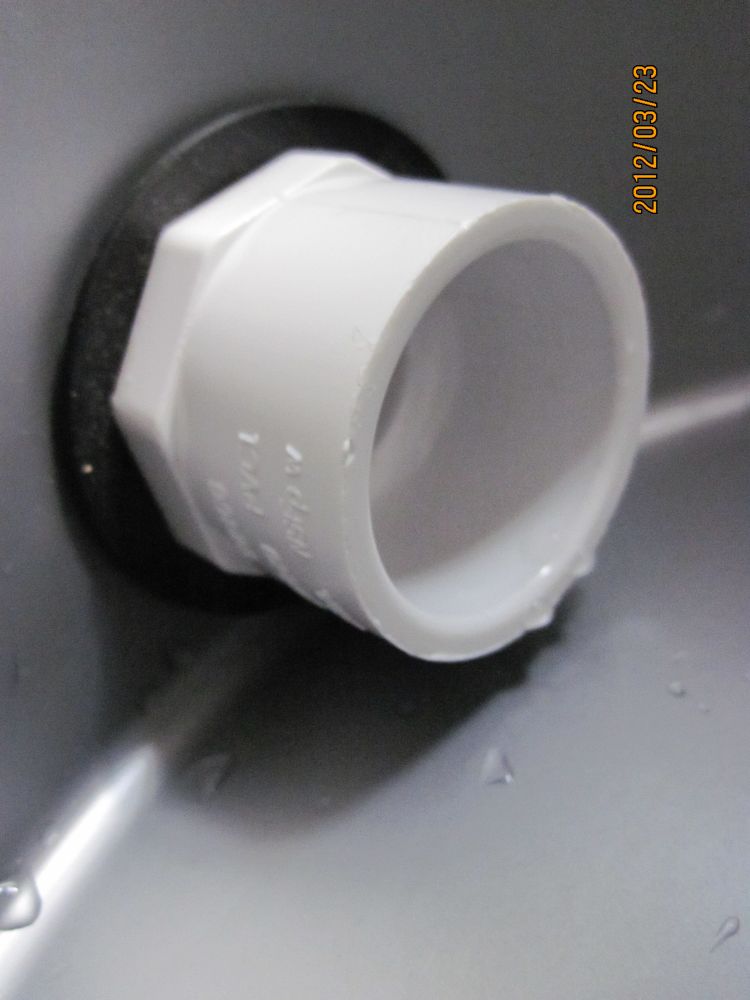
The only cutting I did was for the one inch (25mm) diameter pvc pipe. There are threads underneath the flush valve but not shown in the picture I found, leave these as-is. There is one bead of silicone around the tee to secure the flush valve and prevent water from entering it prematurely. A tee with plug was used instead of an elbow so the flush valve does not adhere crooked. There is a lavatory mack washer on the screw bung going through the container (its a good size fit). The bung hole center is 1.5 inches from the bottom edge of the bucket (used a 1.25 inch drill bit hole). All parts are hand pushed together, making assembly fairly simple. Turn the top and bottom elbows left/right so everything fits in the container and operation of the float is not impeded. Now push down on the flush valve overflow tube so the bottom line of pipe is slightly angled. You want the plug end to be touching the container. This helps prevent the valve tube end from lifting up too much from bouyancy (causing the unit to not work). ![]() So how does this design work? The weight of the rubber seal and float of the flush valve keep it seated on the rim of the opening as the weight of the water column above it increases. Once the water enters the top of the flush valve pipe, it begins to equalize levels with the upward siphon pipe. Once the level of the water in these pipes is high enough, it will reduce the weight pressure on the valve seal and release the float, which opens the siphon inlet. Water rushes out the inlet until air enters the flow and breaks the siphon. The float will then close back down to end the cycle. What you do not see is the remaining water in the upward siphon pipe falls back down and fills up the air pocket underneath the valve seal. It does leave a tiny bit of extra air under the flapper which is just enough for it to seal again. The water level in a 5 gallon bucket is less than one inch from the top of the bucket at the time the valve opens and drains but could easily be a lower level in any taller container. ![]() It can be adapted to any taller/larger container. This design changes the capacity of the 5 gallon flood tank to about 3 gallons which works great for my small system. This design can be adapted to larger containers by adding a 1 inch to 3/4 inch bushing with a 1 inch coupling and additional 1 inch pipe onto the top of the built in flush valve pipe (leave everything else the same). Caveat: I tried adding a small piece of down pipe to the external elbow (about 2-4 inches). This allowed the water to vortex out pretty but also slowed down the output just enough so not enough water was pulled out by the time the flapper closed so the seal would not take. Adding a much longer piece might work, as a larger water column could have the extra strength required to pull more water out at the end of the siphoning action. ![]() ![]() The original design with external piping can be found here: http://www.backyardaquaponics.com/forum/viewtopic.php?f=8&t=10066&p=284915 |
|
| Author: | drstevekckcc [ Mar 29th, '12, 03:48 ] |
| Post subject: | Re: Redesigned Flood Tank 5 gallon |
I like this design much better then your previous one, Thorn! More simplistic and compact!! I may need to replace the one I've been using on my experimental system, after I finish getting my new system up and running!
|
|
| Author: | thorn [ Mar 29th, '12, 10:42 ] |
| Post subject: | Re: Redesigned Flood Tank 5 gallon |
Thank you very much, I agree. ps: The male adapter is used because of it's lip that is really needed to secure the washer. I tried a threaded elbow before (in other designs) but it lacks a lip/rim and it just can't secure a washer very well. I find the lavatory mack washer is awesome for the one inch bung and have used it many times. The washer is thick, doesn't warp beyond being usable and is under $2 USD to boot! |
|
| Author: | thorn [ Jun 4th, '12, 22:03 ] |
| Post subject: | Re: Redesigned Flood Tank 5 gallon |
Quick update: It has been working continuously for 2 months now without any intervention or interruption. |
|
| Author: | james321 [ Jul 26th, '12, 19:54 ] |
| Post subject: | Re: Redesigned Flood Tank 5 gallon |
I was looking to find posts on this particular topic and your post came up first on Google search and finely i have found your post that is even slightly related to what I need Nice post. i have very impressed to see this post. i have gotten lot of information from your post.nice information. nice work keep it up. |
|
| Author: | thorn [ Sep 5th, '12, 01:41 ] |
| Post subject: | Re: Redesigned Flood Tank 5 gallon |
Another update: It has been working continuously for 4 months now without any intervention or interruption. I did place a 2 inch tee, facing up, under it (but not attached to it) to catch and redirect the water to the edges of the growbed instead of directly splashing on some sprouts I have (thereby pummeling them back down). |
|
| Author: | Charlie [ Sep 5th, '12, 06:35 ] |
| Post subject: | Re: Redesigned Flood Tank 5 gallon |
Id say success thorn
|
|
| Author: | Sleepe [ Sep 5th, '12, 11:27 ] |
| Post subject: | Re: Redesigned Flood Tank 5 gallon |
Well done |
|
| Author: | wordthief [ Feb 27th, '13, 13:20 ] |
| Post subject: | Re: Redesigned Flood Tank 5 gallon |
I am building this but the 1 1/4" T and the flushing mechanism are extremely loose. I know silicone can take care of that, but will not the slightest movement break the seal? Is there a gasket that would be appropriate? |
|
| Author: | wordthief [ Mar 1st, '13, 00:28 ] |
| Post subject: | Re: Redesigned Flood Tank 5 gallon |
This is a bad, possibly two millimeter gap at the connection of the flush valve and the 1 1/4" T. Silicone alone is not sufficient to deal with that gap efficiently and on a long term basis, is it? Looking for suggestions. I really like this mechanism. |
|
| Author: | Pershing [ Jul 1st, '13, 23:05 ] |
| Post subject: | Re: Redesigned Flood Tank 5 gallon |
I get how this works more or less but how do you use it within the system? Do you attach this to the GB at level of water? |
|
| Author: | wordthief [ Jul 22nd, '13, 13:02 ] |
| Post subject: | Re: Redesigned Flood Tank 5 gallon |
The distance between the flush valve opening where the flap is and the top of the flush valve pipe is exactly the amount of water that you will flush into the system. I have used this and found it to be almost flawless. Two issues I've experienced: 1. The flush valve can get stuck open if the water is constricted going out, so you want to use piping at least for the first few inches going out. 2. If your water flow into the flush tank (where the valve is) is too slow, the water can potentially reach the top of the pipe and just trickle in, thereby never making the siphon and opening the flap. This does not happen easily, the water has to be a pretty small flow for this to happen but it used to happen in my system when the pump would get clogged quite a bit. (pumping from my fish tank into this flush tank) One nice person in a previous post said they used a toilet float instead of (or attached to?) the flush valve and a trickle then works fine. I have not tried this. As for how water empties into the grow bed.. I've had is splashing onto rock and filer (works fine) and I've had it going into 1" pipe that follows the inner perimeter of my IBC grow bed. Either method works fine. Of course the 1" pipes interconnect with elbows and have holes drilled in them all of the way around like is done in this video http://www.youtube.com/watch?v=WYFM7J_TpTU Good luck ! |
|
| Author: | thorn [ Oct 11th, '13, 23:22 ] |
| Post subject: | Re: Redesigned Flood Tank 5 gallon |
wordthief wrote: This is a bad, possibly two millimeter gap at the connection of the flush valve and the 1 1/4" T. Silicone alone is not sufficient to deal with that gap efficiently and on a long term basis, is it? Looking for suggestions. I really like this mechanism. Once the silicone is cured, it should work without issue. The flap should move long before the two pieces stuck together with silicone do. I had the 5 gallon bucket sitting over the growbed. |
|
| Author: | thorn [ Oct 11th, '13, 23:32 ] |
| Post subject: | Re: Redesigned Flood Tank 5 gallon |
wordthief wrote: The distance between the flush valve opening where the flap is and the top of the flush valve pipe is exactly the amount of water that you will flush into the system. I have used this and found it to be almost flawless. Two issues I've experienced: 1. The flush valve can get stuck open if the water is constricted going out, so you want to use piping at least for the first few inches going out. 2. If your water flow into the flush tank (where the valve is) is too slow, the water can potentially reach the top of the pipe and just trickle in, thereby never making the siphon and opening the flap. This does not happen easily, the water has to be a pretty small flow for this to happen but it used to happen in my system when the pump would get clogged quite a bit. (pumping from my fish tank into this flush tank) One nice person in a previous post said they used a toilet float instead of (or attached to?) the flush valve and a trickle then works fine. I have not tried this. As for how water empties into the grow bed.. I've had is splashing onto rock and filer (works fine) and I've had it going into 1" pipe that follows the inner perimeter of my IBC grow bed. Either method works fine. Of course the 1" pipes interconnect with elbows and have holes drilled in them all of the way around like is done in this video http://www.youtube.com/watch?v=WYFM7J_TpTU Good luck ! #1 read my notes on external piping in the original post #2 This design was made for low flow, possibly drips. If you have a trickle problem, there is a design issue. Extend your flush valve standpipe higher. This would increase the likelyhood of your float wanting to dislodge. I think a 3/4 inch adapter fit at the top of mine (but would hit the 5 gallon bucket lid, not an issue in a bigger container). If you can't obtain a built-in float valve, a regular one should work, just be sure it doesn't get caught on anything and moves freely. |
|
| Author: | thorn [ Apr 22nd, '16, 03:32 ] |
| Post subject: | Re: Redesigned Flood Tank 5 gallon |
2016-04-21 in case anyone comes across this nowadays....to followup on this design (from what I recall a few years ago).... I did try the piping later with a bigger container and it failed unfortunately. This design would be good if you pipe the water into the 5 gallon or 6 gallon (seen at home depot/lowes maybe, similar size, only taller) bucket. I'm thinking it failed because the water pressure from a wider container was not enough to keep the flap open, so the flap closed early and was not able to shut completely. There was still water around the flap area that kept it open. After over a year in moving limbo, I'm testing new designs again and will create a new thread if anything else is successful. |
|
| Page 1 of 2 | All times are UTC + 8 hours |
| Powered by phpBB® Forum Software © phpBB Group https://www.phpbb.com/ |
|