| Backyard Aquaponics http://byap.backyardmagazines.com/forum/ |
|
| New Flood Tank Design http://byap.backyardmagazines.com/forum/viewtopic.php?f=8&t=10066 |
Page 1 of 1 |
| Author: | thorn [ Jul 8th, '11, 21:58 ] |
| Post subject: | New Flood Tank Design |
Tezel Surge Device This is an adaption of Borneman Surge Device and Carlson Surge Device designs. It utilizes a open air outlet pipe loop siphon and the toilet flush valve allows enough water buildup to start full siphon, even at low flow input rates. Design Benefits: Low flow solution. In use at 6gph. Possibly no minimum flow. Siphon has an open air outlet (great for flood tank aquaponics). Common 90 degree pipe parts may be found at local home improvement stores. Tested successfully with 1 1/2 inch and 1/2 inch outlet pipe loop siphons. Tested successfully with different 5 gallon bucket setups. No metal parts. Explanation of Operation: Water fills a container and flows into the toilet flush valve overflow tube which almost equalizes pressure on both sides of a flapper door. The small float on the flapper is able to lift open the flapper, releasing the remaining small airlock, allowing more water to rush the siphon pipe and start the surge. The flapper closes back down when enough water has exited the container and the cycle starts over. Design Considerations: A toilet flush valve in a container is connected to a pipe loop siphon. This was tested using a counterbalance toilet flush valve and also tested with a cheap flush valve using a medium size prescription bottle for a float. Pipe section between the flapper and top of the siphon is the siphon inlet. The length of pipe that is at a lower elevation than the siphon inlet must generate a greater internal volume of water than the siphon inlet to be able to pull enough water out of the container to ensure proper valve closure. The flush valve outlet size may be reduced to a smaller sized pipe siphon. This has been tested using pipe siphons of 1 1/2 inches and 1/2 inch. The 1/2 inch pipe version had to be lengthened considerably, at least doubled, to increase lower outlet volume to ensure proper flapper closure. Ensure siphon top pipe is a lower elevation than the overflow tube height. Ensure siphon top pipe is a higher elevation than the open flapper top. Since the built-in overflow tube is constantly used, it is advisable to install an extra emergency overflow. Expandable Notes: To extend the built-in overflow taller for use with tall containers, use a 3/4 inch to 1 inch slip bushing and a 1 inch slip coupler with a length of 1 inch pipe. The wider inside diameter of 1 inch pipe will not restrict the flow. Troubleshooting: If water flows out before the flapper is open: extend overflow tube higher If water flows out before the flapper is open: lower siphon top pipe If water flows out before the flapper is open: use larger flapper float If the flapper does not completely close: extend siphon outlet pipe horizontal/down Additional keywords: dump tank, flush device, flood and drain, ebb and flow, autosiphon, auto siphon, reef, backpressure, back pressure, surge bucket, surge tank, wavemaker, wave box, surge box, toilet surge device, effluent toilet flapper valve surge, trapped outlet, dosing siphon |
|
| Author: | thorn [ Jul 8th, '11, 22:15 ] |
| Post subject: | Re: New Flood Tank Design |
This picture is a test with most of the pvc inside the 5 gallon bucket. The overflow tube (with extender) is right at the top of the bucket due to getting the siphon top pipe over the open flapper door. You can see the medium sized prescription bottle float. Nylon twine was used and screwed into the top of the float. The float eventually takes on water at an extremely slow rate of a period of days or more so a silicone seal on it would be good for long term use. ![]() 
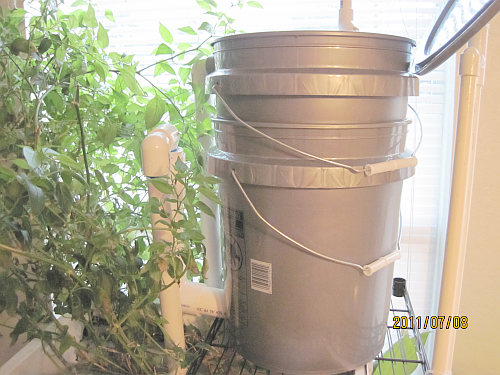
The two pictures below is what I am currently using. The flush valve goes through the bottom of the top bucket with an elbow, reducing bushing, and pipe out to the side that you see here. The bottom bucket is merely used as a stand for the top bucket. The counterbalance toilet flush valve is visible. The trickle of water is running 6 gallons per hour. The 1 inch gray conduit bung is the additional emergency overflow. I normally have a top on the bucket that I removed to take these pictures. ![]() 
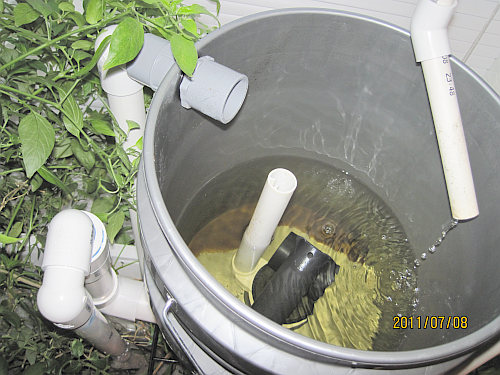
The outlet pipe extends about 4 inches below the bottom bucket. The top of the siphon pipe is below the top of the built-in overflow tube on the flush valve in the top bucket.
|
|
| Author: | Dave Donley [ Jul 9th, '11, 01:08 ] |
| Post subject: | Re: New Flood Tank Design |
| Author: | earthbound [ Jul 9th, '11, 19:52 ] |
| Post subject: | Re: New Flood Tank Design |
I'm still a little confused... So theres a toilet flush valve in the top bucket, flushing into the bucket below that has a siphon?
|
|
| Author: | thorn [ Jul 10th, '11, 02:39 ] |
| Post subject: | Re: New Flood Tank Design |
earthbound wrote: I'm still a little confused... So theres a toilet flush valve in the top bucket, flushing into the bucket below that has a siphon? ![]() No. "The bottom bucket is merely used as a stand for the top bucket." The bottom bucket has a 2 1/2 inch hole in the side at the bottom that the pipe goes through from the first bucket. The bottom bucket is used for lack of a better stand to stabilize the top bucket with the 2 inch elbow underneath it. The bottom bucket could be replaced by three tall bricks or something else with no affect on the flood tank operation. |
|
| Author: | thorn [ Aug 24th, '11, 02:17 ] |
| Post subject: | Re: New Flood Tank Design |
Further testing has brought about one issue with the particular container I am using. 5 gallon buckets may not be all that durable. A crack developed from the flush valve hole twice now. Apparently a better support could be preferable instead of only resting the top bucket on the 2 inch elbow (as it sits on it inside the bottom bucket). The weight of water inside pushes down around that area and eventually may lead to a crack. I have reinforced the underside of the current bucket with pvc cement and duct tape and reinserted the flush valve with a good ring layer of silicone and hand tightened as usual. A better support could be some wood planks (or equivalent) to where the bucket sits on its edge (what 5 gal buckets are used to). If a crack develops again, I will switch supports. |
|
| Author: | thorn [ Sep 2nd, '11, 05:32 ] |
| Post subject: | Re: New Flood Tank Design |
It happened again. The crack got longer even with the glue and tape. I went ahead and updated the container support. Now you can see the unit with only one bucket and the pvc pipe coming out from the bottom of it. The 2 inch elbow is attached to the flush valve threading. ![]() ![]()
|
|
| Author: | thorn [ Oct 14th, '11, 02:41 ] |
| Post subject: | Re: New Flood Tank Design |
Just a quick update....since the support change a month and a half ago, there have been no further bucket crack/leaking issues! Also note that the main design (aside from the bad support issue) has worked continuously since day one without having to touch it. |
|
| Author: | thorn [ Apr 6th, '12, 00:13 ] |
| Post subject: | Re: New Flood Tank Design |
Please see an updated design in this other thread: Redesigned Flood Tank 5 gallon |
|
| Page 1 of 1 | All times are UTC + 8 hours |
| Powered by phpBB® Forum Software © phpBB Group https://www.phpbb.com/ |
|