HI all,
I thought I'd do a quick tutorial on how to add images to posts. I'm sure there are other methods, but these are the two ways I do it. I hope this helps newbies out with one of the bits of functionality which I found not altogether intuitive.
So first you need to resize your images to not more than 800 pixels wide and 600 pixels high. That's a pretty big image for a forum/blog post, as you can see from the images I have used in this tute. There is plenty of guidance in the
Resizing and adding pictures. thread re what applications people use for resizing. I'm a Mac person (at home) and I use Imagewell or Seashore, but there are hundreds of excellent, cheap or free apps for doing this task on Windows or Mac. Note also that not all image format are supported. I use jpg format. Any app that can resize an image should be able to save the image in a variety of formats.
The two ways I use for inserting images into posts are:
- Upload the image to the forum using the 'Upload attachment' dialogue and insert the image inline using the 'Place inline' button on the editor. Note that there is a limit of three images using this method.
- Load the image to my online photo site (flickr, photobucket, etc) and then insert the URL (the web address) for the image into the post using the 'Img' button on the editor.
Lets walk through each of these methods.
The 'Upload attachment' and 'Place inline' method.Remember that there is a limit of three images using this method.
First you need to use the 'Full editor' not the 'Quick reply' editor. If you start a new thread (Topic) you automatically get the 'Full editor', but if you are reading an existing thread and want to reply, you need to click the 'Full editor' button (circled red in the picture below) if you want to add images.
Attachment:
 Full editor_scaled_annotated.jpg [ 34.32 KiB | Viewed 48081 times ]
Once you are in the 'Full editor', when you want to add an image click on the 'Browse' button (circled red in the picture below), select your image, and then click the 'Add the file' button (circled red in the picture below). If your image is resized appropriately and is an allowed file format, it should upload.
Attachment:
 Add The File_scaled_annotated.jpg [ 127.66 KiB | Viewed 48081 times ]
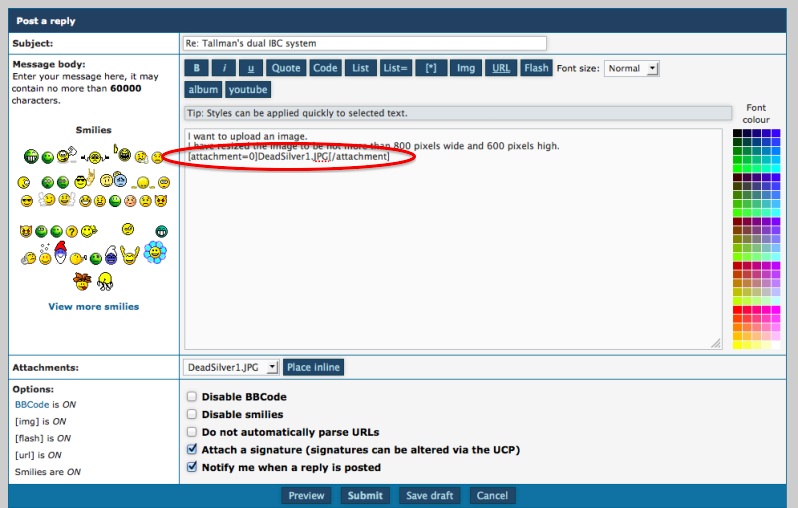
You should now see a new section called 'Attachments' added to the editor. Place your cursor at the location in your typed text where you want your image inserted, then click the 'Place inline' button (circled red in the picture below).
Attachment:
 Place inline_scaled_annotated.jpg [ 127.47 KiB | Viewed 48081 times ]
The image code will be inserted into the editor at the location of your cursor (circled red in the picture below).
To see if the image is where you wanted it click on the 'Preview' button below the editor.
[Note how my picture below looks a bit different to the previous three (border etc). This is because I have hit the three image limit of this method so now I have to use the second method explained next.
Well that's it for this method. Pretty simple, but limited to three images per post.
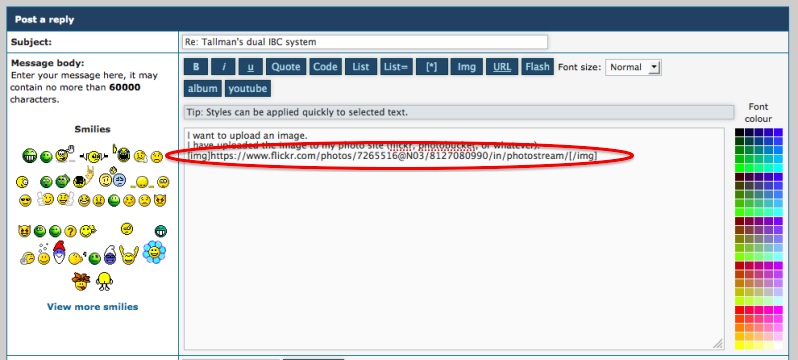
The load elsewhere and insert as 'Img' method.For this method you also need to use the 'Full editor'. This method can be a bit trickier depending on the photo site you use, as you have to learn how to find and copy the URL (web address) for your image after you have uploaded the image. I can't walk you through that as it is different depending on the photo site you use, and can change from time to time when your photo site changes it's user interface.
First, upload your images to your photo site (flickr, photobucket, whatever), and ensure the photos are set to allow public viewing.
In the 'Full editor', when you want to add an image, place your cursor at the location in your typed text where you want your image inserted and click on the 'Img' button (circled green in the picture below).
Note that you can mouse-over (hover your mouse over but don't click) the 'Img' button (or any of those buttons at the top of the editor to see usage examples (circled red in the picture below).

You will see the 'Img' code added and your cursor will be positioned between the two 'Img' tags. Paste in the URL (web address) of the image you uploaded to your photo site. It should end up something like the example circled red in the picture below.
To see if the image is where you wanted it click on the 'Preview' button below the editor.
That's it for this method. Again, pretty simple, but only once you have learnt how to get the URL for the image at your photo site.
I hope this helps people to post pictures as looking at how other members build their systems and solve problems is one of the great joys of this community.
Cheers, Tallman.